FAST Dual Sync Distributor Instructions - Holley EFI

Collapse
X
 
  • Filter
  • Time
  • Show
Clear All
new posts
  • Danny Cabral
    Administrator
    • Dec 2009
    • 35959

    FAST Dual Sync Distributor Instructions - Holley EFI

    Originally Posted by Danny Cabral
    FYI: Holley EFI now sells their own Dual Sync (LINK) & HyperSpark (LINK) Hall-Effect distributors.
    They're a small cap design, "plug & play" with Holley EFI, and no need for a modified Firing Order.
    The Dual Sync crank & cam sensor signals also provide sequential injection capability (MPFI applications).
    The Dual Sync is "plug & play" (into the 10-pin ignition connector on the EFI Main Harness), and both
    distributors require a CD ignition box (Instructions), unless the Dual Sync is used with a CNP ignition system.
    The MSD 6201 Digital 6A CDI box & 8253 HVC-2 coil are a great match.
    The MSD CD ignition box is wired as shown in the Holley EFI Wiring Manual:
    http://documents.holley.com/techlibr...10555rev17.pdf (Holley EFI Wiring Manual - Figure 11, Page 20)
    https://www.youtube.com/watch?v=AM7r-DauCak (Holley EFI Dual Sync Distributor - YouTube Tech Video)
    https://www.youtube.com/watch?v=2JpHlS1ymBc (Holley EFI HyperSpark Distributor - YouTube Tech Video)
    A Dual Sync blank cap is available (LINK & LINK), if the user decides to convert to Coil-Near-Plug/DIS later (no
    CDI box). Of course, the Dual Sync distributor can also be used as a crank and/or cam sync/oil pump drive unit.

    The Custom Ignition Parameters (in System Parameters) for the Holley EFI Dual Sync Distributor:
    Ignition Type ............. ― "Custom"
    Crank Sensor Type ..... ― "1 Pulse/Fire" (← Holley Dual Sync Distributor)
    Sensor Type .............. ― "Digital Falling"
    Inductive Delay .......... ― "100.0 usec" (← Synchronization info, adjusted per application.)
    Ignition Reference Angle ― "50°" (← Inherent Ignition Reference Angle & rotor-phasing of this unit.)
    Cam Sensor Type ........ ― "Single Pulse" (← "Not Used" for TBI, unless CNP ignition.)
    Sensor Type .............. ― "Digital Falling"
    Output Setup Type ..... ― "Points Output Fixed Duty Cycle (MSD)" (← MSD CD Ignition Box)
    -----------------------------------------------------------
    Holley CNP Smart Coils and/or GM LSx Ignition Coils (no CD ignition box required):
    Output Setup Type ..... ― "DIS Coil On Plug" (← Holley CNP Smart Coils and/or LSx Ignition Coils)
    Dwell Time ................ ― "3.5-5.0 msec" (← See page 1 for Holley CNP coils, and page 3 for GM LSx coils.)
    https://www.holley.com/brands/holley...efi_dual_sync/ (Holley EFI Dual Sync Distributors)

    The Custom Ignition Parameters (in System Parameters) for the Holley EFI HyperSpark Distributor:
    Ignition Type ............. ― "Custom"
    Crank Sensor Type ..... ― "1 Pulse/Fire" (← Holley HyperSpark Distributor)
    Sensor Type .............. ― "Digital Rising" (← I prefer Digital Falling, LINK.)
    Inductive Delay .......... ― "100.0 usec" (← Synchronization info, adjusted per application.)
    Ignition Reference Angle ― "57.5°" (← Inherent Ignition Reference Angle & rotor-phasing of this unit.)
    Cam Sensor Type ........ ― "Not Used" (← This distributor doesn't have a cam sensor.)
    Output Setup Type ..... ― "Points Output Fixed Duty Cycle (MSD)" (← MSD CD Ignition Box)
    https://www.holley.com/brands/holley..._distributors/ (Holley EFI HyperSpark Distributors)
    https://www.holley.com/products/fuel.../parts/558-323 (Holley EFI HyperSpark Ignition Adapter)
    .
    Originally Posted by Danny Cabral
    Crank & Cam Sensor Wiring Tips:
    The 10-pin Ignition Connector has one "Chassis Ground" (loose black wire ground) and two "IPU Grounds" (clean ECU ground).
    Don't use "Chassis Ground" to ground an ignition module (or crank & cam sensors). It's quick & easy to move the ignition
    module ground wire from (cavity) pin D "Chassis Ground" to pin C or G "IPU Ground", where it should be.

    If you don't have the actual Metri-Pack terminal release tool, a "safety pin" will work.
    It just needs to be a stiff wire between .030"-.035" in diameter to release the terminal tab.
    Then reopen (bend) the terminal tab before reinsertion, so it will clip (lock) into the cavity.
    http://www.whiteproducts.com/removal_tools.shtml (T-6 Micro Terminal Release Pick Tool)

    Also, don't use (cavity) pin E "Switched +12V" from the 10-pin Ignition Connector, to power an ignition module
    (or crank & cam sensors), unless you've modified the wiring source to connect from pin B20 - EST 12V Output
    (P1B ECU Connector). This LINK explains why & how to do it.
    http://documents.holley.com/techlibr...10555rev17.pdf (Holley EFI Wiring Manual, Sections 2.1 "Pin-Outs" & 13.0 "Wiring Appendix")
    ---------------------------------------------------------------------------------------------------------------------------

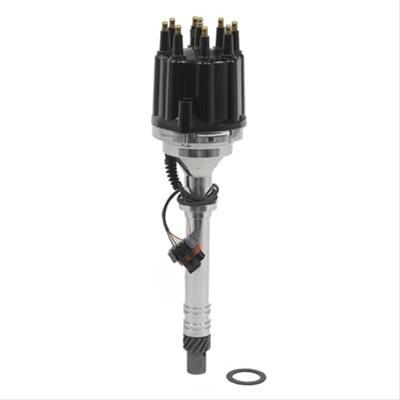
    • Holley 558-313 Ignition Adapter Harness for FAST Dual Sync Distributors:
    http://documents.holley.com/199r10687rev2.pdf (FAST Ignition Adapter Instructions)
    The FAST Dual Sync distributor harness connects to the Holley EFI 10-pin ignition harness connector.

    • A CD ignition box must be used because the FAST Dual Sync distributor only outputs crank & cam signals. (No ignition coil driver.)
    This means the loose white "Points Output" wire (Holley EFI main harness) is utilized to trigger the CD ignition box, which fires the coil.
    See figure 11 wiring diagram, on page 20 of the Holley EFI Wiring Manual:
    http://documents.holley.com/techlibr...10555rev17.pdf (Holley EFI Wiring Manual)

    • If a custom shielded cable is used (for whatever reason - not necessary), the "drain wire" is only supposed to be grounded at one end.
    1) Holley ECUs already have the shield (drain) wire connection/pin grounded inside, so don't ground it at the sensor end.
    2) The ECU already has the pull-up resistor for sinking output (open collector) sensors inside, so don't add anything.
    http://www.newark.com/pdfs/techartic...haWire/USC.pdf (Shielded Wiring - look for "drain wire" on page 2 & 3.)
    Think of the shield wire as an antenna pointing to the sensor; it's only supposed to be grounded at the ECU end.

    • Holley EFI ten cavity ignition harness connections:
    Pin "E" provides +12V to both crank & cam sensors.
    Pin "C" or "D" provides ground to both crank & cam sensors.
    Pin "B" is the cam sensor's signal input.
    Pin "A" is the crank sensor's signal input.

    See figure 11 & 12 - page 20 & 21 (Hall-Effect) of the Holley EFI Wiring Manual:
    http://documents.holley.com/techlibr...10555rev17.pdf (Holley EFI Wiring Manual)

    • The Custom Ignition Parameters (in System Parameters) of the FAST Dual Sync distributor:
    Ignition Type ............. ― "Custom"
    Crank Sensor Type ..... ― "1 Pulse/Fire"
    Sensor Type .............. ― "Digital Rising"
    Inductive Delay .......... ― "adjusted per application" (← Synchronization info.)
    Ignition Reference Angle ― "50°" (← Inherent rotor-phasing of this unit.)
    Cam Sensor Type ........ ― "Single Pulse"
    Sensor Type .............. ― "Digital Rising"
    Output Setup Type ..... ― "Points Output"
    Dwell Time ................. ― "2.0 msec" (← Do not set this to 1.5 msec!)

    Originally posted by Excerpt from Holley 558-313 Instructions
    Firing Order Change:
    A) In the “System Parameters” ICF, under the “Ignition Parameters” tab, select an “Ignition Type” of “Custom” (Fig 2).
    B) Select the “Configure” tab and enter the information per Figure 3. This is assuming you are triggering an MSD/CD Ignition box.
    C) Holley EFI expects the cam signal to occur in a certain position. For this to occur in the correct location, you’ll need to change the firing order. To do this, move the cylinder that is first in the firing order, to the last position. The following example shows what you’d need for a standard Chevy V8, changing the firing order from 1-8-4-3-6-5-7-2 to 8-4-3-6-5-7-2-1. Figure 4 shows how this should look when completed.
    D) Once the Holley EFI Global Folder is updated, you can send it to the ECU. Cycle the ignition key before starting the engine.
    Originally posted by Holley EFI Tech Department
    F.A.S.T. Dual Sync Distributor Wiring & Setup Instructions

    ................... - FAST Wire Color - FAST Connector - Holley Ignition Connector
    Power: ........ - Red ................. - Loose .............. - E
    Ground: ....... - Black ............... - D .................... - C or D
    Crank Signal: - Brown .............. - F .................... - A
    Cam Signal: . - Yellow ............. - C .................... - B

    Setup everything in the ECU after the wiring is completed. Go to System Parameters and click Ignition Parameters. The Ignition Type needs to be set to “Custom” and click the button that says Configure. In the Crank Sensor box the Type needs to be set to “1 pulse/fire” and the Sensor Type needs to be “Digital Rising.” In the cam sensor box the Type needs to be set to “Single Pulse” and the Sensor Type needs to be “Digital Rising.” The output setup box refers to how the ECU fires the ignition system and is described in the manual.

    Decide when you want the crank signal to occur, which is typically around 50 degrees before TDC # 1 on compression stroke. Unless you have good reason not to, use 50 degrees BTDC since this matches the rotor phasing designed into the distributor. Enter this into the Ignition Reference Angle, which how you tell the ECU the number of degrees before top dead center that the crank pulse happens. In this case, it is where the sensor output goes from low to high, or when the indicator light in the distributor turns on.

    Turn the key on with engine off and go "Online". Click the button that says Send TO ECU. After this is complete, turn the key back off.

    Follow the instructions with the distributor to make sure the pickup is in the 50 degree location to insure proper rotor phasing.

    Rotate the engine until cylinder # 1 is about 30° before TDC on compression stroke. Turn the rotor until it is close to where you want the plug wire for cylinder # 1 to be. In a typical Chevy application the # 1 wire should be toward the front of the engine, slightly toward the driver’s side of centerline. Drop the distributor in making sure that it falls all of the way down and fully engages the oil pump drive. This may require turning the oil pump shaft or turning the engine slightly.

    Turn the engine over until it is resting at the Ignition Reference Angle, which should be 50° BTDC.
    If you do not have a damper with degree markings, use the following formula to calculate the approximate distance.
    The mark on the damper should be from the TDC mark on the timing tab, to equal a 50° angle.
    Distance = (Damper Diameter) x 0.436
    For some common damper sizes:
    Damper Diameter - Distance
    6.00" ........ - ........ 2.617"
    6.75" ........ - ........ 2.945"
    7.00" ........ - ........ 3.054"
    7.50" ........ - ........ 3.272"

    Disconnect the coil and turn the power on to the system.

    With the distributor cap off, locate the cam and crank lights. The cam light is at the lower left of the pickup assembly and the crank light is at the lower right. If you turn the distributor housing the crank light will activate every 45° of rotation. The cam light will activate only one time per distributor revolution, or once per cycle.

    Turn distributor housing opposite the direction the rotor turns (counterclockwise for Chevy) until the cam light is on. This usually happens when the rotor tip it directly over the crank light.

    Continue turning opposite rotor direction until the crank light is on.

    Continue turning opposite rotor direction until the crank light goes off.

    Slowly continue turning opposite rotor direction until the crank light just turns on. At this point the rotor will be about a quarter turn past the pickup assembly.

    Summarizing, you drop it in and turn it until you pass the one cam pulse, pass one crank pulse, and land at the beginning of next crank pulse.

    The # 1 plug wire will be where the rotor is pointing. If this is not where you want it, pull the distributor and turn the rotor until it is pointing in the right direction and drop it back in. You may have to turn engine (or the oil pump shaft before you drop in the distributor) to get it to drop down the whole way. Put the engine back at your desired “Ignition Reference Angle” and turn the housing until you get the right light sequence again. In a typical Chevy application the # 1 wire should be toward the front of the engine slightly toward the driver’s side of centerline, which would put the pickup on the drivers side, slightly to the rear.

    Snug down the hold-down, reconnect the coil, and turn it over to make sure the timing is in the right range. Note that the crank timing can be different that the map timing. The crank timing can be found by going to System Parameters and clicking Ignition Parameters. The cranking parameters are in a box at the lower right. Timing will be what the ECU uses when the engine speed is less than the Crank to Run RPM. Look at the Ignition Timing variable in the software while cranking to make sure you are measuring the same thing the ECU is commanding. You can dial in the timing by turning the distributor just like you would with a normal distributor, but for the cranking test you just want to make sure it’s close.

    Once the engine is running the timing adjustment is much more accurate and this should be where you do the final adjustment. This does not have to be at low idle. For a large cam engine increase the engine speed until it smooths out so that it is more accurate. Sometimes it is helpful so temporarily set the entire base timing table to a single value (like 30 degrees) so that the target timing is not influenced by changes in speed or MAP. Again, look at the Ignition Timing variable in the software to make sure you are measuring the same thing the ECU is commanding as there can be modifiers based on different temperatures.

    If you find that you are off by a small amount (less than 5 degrees or so) after you’ve tightened everything down and you would rather not turn the distributor, you can also adjust the Ignition Reference Angle in the software to realign the timing. If timing is too retarded, reduce the Ignition Reference Angle. If timing is too advanced, increase the Ignition Reference Angle. Be aware that every time you change this parameter you have to go Offline (USB Link), change it, click Send TO ECU when going Online, and turn the key off before the change will take effect. Without doing a key-off the change is not applied.

    https://www.fuelairspark.com/distrib...tributors.html (FAST Dual Sync Distributors)
    https://www.fuelairspark.com/ignitio...omponents.html (Replacement Parts)
    http://www.summitracing.com/search/b...s?autoview=SKU (Summit Racing)
    May God's grace bless you in the Lord Jesus Christ.
    '92 Ford Mustang GT: 385"/6.3L SBF, Dart SHP 8.2 block, Eagle 3.470" forged steel crankshaft & H-beam rods, Wiseco 4.200" forged pistons, Trick Flow Twisted Wedge 11R 205 CNC Comp Ported heads, 12:1 compression ratio, 232°-244° duration/.623" lift/114° LSA H/R camshaft, Trick Flow R-Series FTI Comp Ported intake, BBK 80mm throttle body, Holley Dominator MPFI & DIS, Holley 36-1 crank trigger, MSD 1x cam sync, PA PMGR starter, PA 200A 3G alternator, Optima 34/78 Red battery, 100HP progressive dry direct-port NOS, R134a A/C, Spal Dual 12" HP 3168 CFM fans, Frostbite 3-core aluminum radiator, Pypes SS dual 2.5" exhaust, SS off-road X-pipe, SS shorty headers, OEM smog pump converted vacuum pump, Earl's -6AN fuel system plumbing, Walbro 255 LPH in-tank pump & Pro-M -6AN hanger, S&W subframe connectors, BMR upper & lower torque box reinforcements, highly modified Ford 4R70W transmission, FTI 9.5"/3000 stall/triple disc TCC, B&M Hammer shifter, Stifflers trans crossmember & driveshaft safety loop, FPP aluminum driveshaft, FPP 3.73 gears, Cobra Trac-Lok differential, Moser 31 spline axles, '04 Cobra 4-disc brakes, '93 Cobra booster & M/C, 5-lug Bullitt wheels & 245/45R17 M/T Street Comp tires.
  • 67tt502
    Member
    • Jul 2014
    • 32

    #2
    • Holley EFI ten cavity ignition harness connections:
    Pin "E" provides +12V to both crank & cam sensors.
    Pin "D" provides ground to both crank & cam sensors.
    Pin "B" is the cam sensor's signal input.
    Pin "A" is the crank sensor's signal input.

    Danny, I bought the Fast Dual Sync wire harness adapter #558-313. On the ten cavity plug adapter, it utilizes PIN A, B, C & E. In your notes, the ground should be in PIN D (black wire); the adapter utilizes PIN C. Could this be the reason why I'm not getting an RPM signal?

    Click image for larger version

Name:	IMG_3815.JPG
Views:	1
Size:	75.2 KB
ID:	337108
    Last edited by 67tt502; 08-30-2014, 02:04 AM.

    Comment

    • Danny Cabral
      Administrator
      • Dec 2009
      • 35959

      #3
      Originally posted by 67tt502 View Post
      Could this be the reason why I'm not getting an RPM signal?
      EDIT: Cavity "C" is an IPU Ground, and it's a perfectly acceptable (and preferred) ground for crank & cam sensors.
      Holley used to use cavity "D" (Chassis Ground) to ground the FAST crank & cam sensors; evidently, not anymore.
      Originally Posted by Danny Cabral
      Crank & Cam Sensor Wiring Tips:
      The 10-pin Ignition Connector has one "Chassis Ground" (loose black wire ground) and two "IPU Grounds" (clean ECU ground).
      Don't use "Chassis Ground" to ground an ignition module (or crank & cam sensors). It's quick & easy to move the ignition
      module ground wire from (cavity) pin D "Chassis Ground" to pin C or G "IPU Ground", where it should be.

      If you don't have the actual Metri-Pack terminal release tool, a "safety pin" will work.
      It just needs to be a stiff wire between .030"-.035" in diameter to release the terminal tab.
      Then reopen (bend) the terminal tab before reinsertion, so it will clip (lock) into the cavity.
      http://www.whiteproducts.com/removal_tools.shtml (T-6 Micro Terminal Release Pick Tool)

      Also, don't use (cavity) pin E "Switched +12V" from the 10-pin Ignition Connector, to power an ignition module
      (or crank & cam sensors), unless you've modified the wiring source to connect from pin B20 - EST 12V Output
      (P1B ECU Connector). This LINK explains why & how to do it.
      http://documents.holley.com/techlibr...10555rev17.pdf (Holley EFI Wiring Manual, Sections 2.1 "Pin-Outs" & 13.0 "Wiring Appendix")
      http://documents.holley.com/techlibr...10555rev17.pdf (For Reference - Holley EFI Wiring Manual, Section 2.1 "ECU Pin-Outs")​
      May God's grace bless you in the Lord Jesus Christ.
      '92 Ford Mustang GT: 385"/6.3L SBF, Dart SHP 8.2 block, Eagle 3.470" forged steel crankshaft & H-beam rods, Wiseco 4.200" forged pistons, Trick Flow Twisted Wedge 11R 205 CNC Comp Ported heads, 12:1 compression ratio, 232°-244° duration/.623" lift/114° LSA H/R camshaft, Trick Flow R-Series FTI Comp Ported intake, BBK 80mm throttle body, Holley Dominator MPFI & DIS, Holley 36-1 crank trigger, MSD 1x cam sync, PA PMGR starter, PA 200A 3G alternator, Optima 34/78 Red battery, 100HP progressive dry direct-port NOS, R134a A/C, Spal Dual 12" HP 3168 CFM fans, Frostbite 3-core aluminum radiator, Pypes SS dual 2.5" exhaust, SS off-road X-pipe, SS shorty headers, OEM smog pump converted vacuum pump, Earl's -6AN fuel system plumbing, Walbro 255 LPH in-tank pump & Pro-M -6AN hanger, S&W subframe connectors, BMR upper & lower torque box reinforcements, highly modified Ford 4R70W transmission, FTI 9.5"/3000 stall/triple disc TCC, B&M Hammer shifter, Stifflers trans crossmember & driveshaft safety loop, FPP aluminum driveshaft, FPP 3.73 gears, Cobra Trac-Lok differential, Moser 31 spline axles, '04 Cobra 4-disc brakes, '93 Cobra booster & M/C, 5-lug Bullitt wheels & 245/45R17 M/T Street Comp tires.

      Comment

      • Nick304
        Junior Member
        • Sep 2014
        • 2

        #4
        Can this distributor be used with the Terminator EFI by swapping the software, and adding a points output wire to the ECU? I'm setting up a Mopar 318 that was running a carb & MSD ignition system, and would like to add the Terminator with ignition control. The options for distributors for this engine are limited, but the FAST is one of them, and is a cheap & easy way to get a crank trigger. Could the settings in the ECU be changed to allow the option of "other ignition" with a laptop? Regards, Nick

        Comment

        • Danny Cabral
          Administrator
          • Dec 2009
          • 35959

          #5
          Originally posted by Nick304 View Post
          Can this distributor be used with the Terminator EFI by swapping the software...
          You're actually not "swapping" the EFI software, you're just installing it into your laptop.

          ...and adding a points output wire to the ECU?
          Yes, you'd have to add it to the EFI main harness.
          (The earlier Terminator EFI wiring harnesses didn't have the loose Points Output white wire. It does now.)

          Could the settings in the ECU be changed to allow the option of "other ignition" with a laptop?
          Yes, the Terminator EFI uses the same ECU as the Avenger/HP EFI, and it can be upgraded to an HP EFI simply by connecting a laptop computer (USB cable).
          May God's grace bless you in the Lord Jesus Christ.
          '92 Ford Mustang GT: 385"/6.3L SBF, Dart SHP 8.2 block, Eagle 3.470" forged steel crankshaft & H-beam rods, Wiseco 4.200" forged pistons, Trick Flow Twisted Wedge 11R 205 CNC Comp Ported heads, 12:1 compression ratio, 232°-244° duration/.623" lift/114° LSA H/R camshaft, Trick Flow R-Series FTI Comp Ported intake, BBK 80mm throttle body, Holley Dominator MPFI & DIS, Holley 36-1 crank trigger, MSD 1x cam sync, PA PMGR starter, PA 200A 3G alternator, Optima 34/78 Red battery, 100HP progressive dry direct-port NOS, R134a A/C, Spal Dual 12" HP 3168 CFM fans, Frostbite 3-core aluminum radiator, Pypes SS dual 2.5" exhaust, SS off-road X-pipe, SS shorty headers, OEM smog pump converted vacuum pump, Earl's -6AN fuel system plumbing, Walbro 255 LPH in-tank pump & Pro-M -6AN hanger, S&W subframe connectors, BMR upper & lower torque box reinforcements, highly modified Ford 4R70W transmission, FTI 9.5"/3000 stall/triple disc TCC, B&M Hammer shifter, Stifflers trans crossmember & driveshaft safety loop, FPP aluminum driveshaft, FPP 3.73 gears, Cobra Trac-Lok differential, Moser 31 spline axles, '04 Cobra 4-disc brakes, '93 Cobra booster & M/C, 5-lug Bullitt wheels & 245/45R17 M/T Street Comp tires.

          Comment

          • Nick304
            Junior Member
            • Sep 2014
            • 2

            #6
            Thank you Danny. I have added the points wire and will load the software to my laptop. Can I ground the shield on the distributor cable to the "shield" pin on the ECU, that is used for the WBO2, or is there another shield available?

            Comment

            • Danny Cabral
              Administrator
              • Dec 2009
              • 35959

              #7
              Originally posted by Nick304 View Post
              Can I ground the shield on the distributor cable to the "shield" pin on the ECU, that is used for the WBO2, or is there another shield available?
              The Ignition connector already has a shield terminal - pin "C":
              http://documents.holley.com/199r10653rev7.pdf (Terminator EFI Manual - Figure 82, Page 35)
              It's the IPU Ground from pin A14-P1A ECU connector:
              http://documents.holley.com/techlibr...10555rev16.pdf (Holley EFI Wiring Manual - Figure 18, Page 31)
              May God's grace bless you in the Lord Jesus Christ.
              '92 Ford Mustang GT: 385"/6.3L SBF, Dart SHP 8.2 block, Eagle 3.470" forged steel crankshaft & H-beam rods, Wiseco 4.200" forged pistons, Trick Flow Twisted Wedge 11R 205 CNC Comp Ported heads, 12:1 compression ratio, 232°-244° duration/.623" lift/114° LSA H/R camshaft, Trick Flow R-Series FTI Comp Ported intake, BBK 80mm throttle body, Holley Dominator MPFI & DIS, Holley 36-1 crank trigger, MSD 1x cam sync, PA PMGR starter, PA 200A 3G alternator, Optima 34/78 Red battery, 100HP progressive dry direct-port NOS, R134a A/C, Spal Dual 12" HP 3168 CFM fans, Frostbite 3-core aluminum radiator, Pypes SS dual 2.5" exhaust, SS off-road X-pipe, SS shorty headers, OEM smog pump converted vacuum pump, Earl's -6AN fuel system plumbing, Walbro 255 LPH in-tank pump & Pro-M -6AN hanger, S&W subframe connectors, BMR upper & lower torque box reinforcements, highly modified Ford 4R70W transmission, FTI 9.5"/3000 stall/triple disc TCC, B&M Hammer shifter, Stifflers trans crossmember & driveshaft safety loop, FPP aluminum driveshaft, FPP 3.73 gears, Cobra Trac-Lok differential, Moser 31 spline axles, '04 Cobra 4-disc brakes, '93 Cobra booster & M/C, 5-lug Bullitt wheels & 245/45R17 M/T Street Comp tires.

              Comment

              • 81 TransAm
                Senior Member
                • Nov 2014
                • 2238

                #8
                I'm confused, it happens.
                The directions that come with the Holley EFI 558-313 adapter harness says:
                "Install the distributor per the instructions included with the distributor. Use the 50 degree reference angle instructions."
                You drop the distributor in, rotate counterclockwise past one cam signal and land on the start of the first crank signal and lock it down.
                Then you change the firing order from 1-8-4-3-6-5-7-2 to 8-4-3-6-5-7-2-1.
                But in the post above it says to:
                "Summarizing, you drop it in and turn it until you pass the one cam pulse, pass one crank pulse, and land at the beginning of next crank pulse."
                And says nothing about changing the firing order.
                Which is correct? Are they both correct? Two ways to get to the same place?

                Comment

                • Danny Cabral
                  Administrator
                  • Dec 2009
                  • 35959

                  #9
                  Originally posted by 81 TransAm View Post
                  Which is correct? Are they both correct? Two ways to get to the same place?
                  The firing order must be changed. Follow the Holley 558-313 ignition adapter instructions.
                  The quote from Holley Tech above, was posted before the adapter & instructions existed.
                  May God's grace bless you in the Lord Jesus Christ.
                  '92 Ford Mustang GT: 385"/6.3L SBF, Dart SHP 8.2 block, Eagle 3.470" forged steel crankshaft & H-beam rods, Wiseco 4.200" forged pistons, Trick Flow Twisted Wedge 11R 205 CNC Comp Ported heads, 12:1 compression ratio, 232°-244° duration/.623" lift/114° LSA H/R camshaft, Trick Flow R-Series FTI Comp Ported intake, BBK 80mm throttle body, Holley Dominator MPFI & DIS, Holley 36-1 crank trigger, MSD 1x cam sync, PA PMGR starter, PA 200A 3G alternator, Optima 34/78 Red battery, 100HP progressive dry direct-port NOS, R134a A/C, Spal Dual 12" HP 3168 CFM fans, Frostbite 3-core aluminum radiator, Pypes SS dual 2.5" exhaust, SS off-road X-pipe, SS shorty headers, OEM smog pump converted vacuum pump, Earl's -6AN fuel system plumbing, Walbro 255 LPH in-tank pump & Pro-M -6AN hanger, S&W subframe connectors, BMR upper & lower torque box reinforcements, highly modified Ford 4R70W transmission, FTI 9.5"/3000 stall/triple disc TCC, B&M Hammer shifter, Stifflers trans crossmember & driveshaft safety loop, FPP aluminum driveshaft, FPP 3.73 gears, Cobra Trac-Lok differential, Moser 31 spline axles, '04 Cobra 4-disc brakes, '93 Cobra booster & M/C, 5-lug Bullitt wheels & 245/45R17 M/T Street Comp tires.

                  Comment

                  • 81 TransAm
                    Senior Member
                    • Nov 2014
                    • 2238

                    #10
                    I set it up using the 558-313 instructions. But I haven't switched over to sequential yet, so I just wanted to be sure for when I do. Thanks for the info.

                    Comment

                    • Danny Cabral
                      Administrator
                      • Dec 2009
                      • 35959

                      #11
                      Originally posted by 81 TransAm View Post
                      I set it up using the 558-313 instructions. But I haven't switched over to sequential yet, so I just wanted to be sure for when I do.
                      Update this thread when you're sequentially injected. If the Holley 558-313 instructions were all you needed for proper installation, I'll probably remove the old instructions from the Holley EFI Tech Department. (I don't want it confusing anyone else.)
                      May God's grace bless you in the Lord Jesus Christ.
                      '92 Ford Mustang GT: 385"/6.3L SBF, Dart SHP 8.2 block, Eagle 3.470" forged steel crankshaft & H-beam rods, Wiseco 4.200" forged pistons, Trick Flow Twisted Wedge 11R 205 CNC Comp Ported heads, 12:1 compression ratio, 232°-244° duration/.623" lift/114° LSA H/R camshaft, Trick Flow R-Series FTI Comp Ported intake, BBK 80mm throttle body, Holley Dominator MPFI & DIS, Holley 36-1 crank trigger, MSD 1x cam sync, PA PMGR starter, PA 200A 3G alternator, Optima 34/78 Red battery, 100HP progressive dry direct-port NOS, R134a A/C, Spal Dual 12" HP 3168 CFM fans, Frostbite 3-core aluminum radiator, Pypes SS dual 2.5" exhaust, SS off-road X-pipe, SS shorty headers, OEM smog pump converted vacuum pump, Earl's -6AN fuel system plumbing, Walbro 255 LPH in-tank pump & Pro-M -6AN hanger, S&W subframe connectors, BMR upper & lower torque box reinforcements, highly modified Ford 4R70W transmission, FTI 9.5"/3000 stall/triple disc TCC, B&M Hammer shifter, Stifflers trans crossmember & driveshaft safety loop, FPP aluminum driveshaft, FPP 3.73 gears, Cobra Trac-Lok differential, Moser 31 spline axles, '04 Cobra 4-disc brakes, '93 Cobra booster & M/C, 5-lug Bullitt wheels & 245/45R17 M/T Street Comp tires.

                      Comment

                      • 81 TransAm
                        Senior Member
                        • Nov 2014
                        • 2238

                        #12
                        Update: Finished my conversion to sequential MPFI.
                        I used the instructions that came with the Holley EFI 558-313 ignition adapter harness.
                        I had to crank it a bit to get the air out of the fuel lines, but then it fired right up, and idled very nice for a first start.

                        Comment

                        • 68chevelle
                          Junior Member
                          • May 2014
                          • 17

                          #13
                          Danny, I had to reinstall my distributor and I'm confused on how I did it before. I need 50° BTDC, which is approximately 3.5 in from 0 (no issue).
                          However, there's a discrepancy in the FAST vs Holley instructions. The Holley instructions dictate you must find the cam light (green), then crank light then continue until the edge of the next crank light. FAST instructions say to find cam light, then find the edge of next crank light. Those are different directives, wondering if you know more. Holley tech is saying it after 2 crank lights, FAST says 1. I'm sure others will encounter this.

                          Thanks, Paul

                          Comment

                          • Danny Cabral
                            Administrator
                            • Dec 2009
                            • 35959

                            #14
                            Originally posted by 68chevelle View Post
                            However, there's a discrepancy in the FAST vs Holley instructions.
                            You're supposed to use the Holley EFI 558-313 instructions (Link), not the FAST instructions. That's what the last few posts of this thread are about. Holley instructions for Holley EFI, and FAST instructions for FAST EFI.
                            May God's grace bless you in the Lord Jesus Christ.
                            '92 Ford Mustang GT: 385"/6.3L SBF, Dart SHP 8.2 block, Eagle 3.470" forged steel crankshaft & H-beam rods, Wiseco 4.200" forged pistons, Trick Flow Twisted Wedge 11R 205 CNC Comp Ported heads, 12:1 compression ratio, 232°-244° duration/.623" lift/114° LSA H/R camshaft, Trick Flow R-Series FTI Comp Ported intake, BBK 80mm throttle body, Holley Dominator MPFI & DIS, Holley 36-1 crank trigger, MSD 1x cam sync, PA PMGR starter, PA 200A 3G alternator, Optima 34/78 Red battery, 100HP progressive dry direct-port NOS, R134a A/C, Spal Dual 12" HP 3168 CFM fans, Frostbite 3-core aluminum radiator, Pypes SS dual 2.5" exhaust, SS off-road X-pipe, SS shorty headers, OEM smog pump converted vacuum pump, Earl's -6AN fuel system plumbing, Walbro 255 LPH in-tank pump & Pro-M -6AN hanger, S&W subframe connectors, BMR upper & lower torque box reinforcements, highly modified Ford 4R70W transmission, FTI 9.5"/3000 stall/triple disc TCC, B&M Hammer shifter, Stifflers trans crossmember & driveshaft safety loop, FPP aluminum driveshaft, FPP 3.73 gears, Cobra Trac-Lok differential, Moser 31 spline axles, '04 Cobra 4-disc brakes, '93 Cobra booster & M/C, 5-lug Bullitt wheels & 245/45R17 M/T Street Comp tires.

                            Comment

                            • 68chevelle
                              Junior Member
                              • May 2014
                              • 17

                              #15
                              Awesome. Thanks again bud. I'll refer to the tech notes on page one. The Holley instructions just refer to wiring, etc.

                              Comment

                              Working...
                              X